

Back to Day 5 of MFT's Camp Create August 2017! It's the last day, but I'm gonna circle back to the Bonus Campire project tomorrow. For today it's all about Delightful Diecuts and here's what I made:

This was a lot of fun and I love the way it came out!

I started by ink distressing two panels in blue and purple... then I picked my favorite one and set it aside for my background...

And then I took the second and diecut my Snowflake doily from Cottage Kutz and since I had extra room on the panel, I also diecut some snowflakes from Lawn Fawn. A couple "tips" from me:
First... see that cool green tool... if you love to diecut intricate dies such as doilies and snowflakes this is a must have! Mine is from Fun Stampers Journey and there are a few different tools out there. I can't speak to those, but I can tell you I love mine... it has that cool brush on one end and a poker on the other... this one also has some other tools that I haven't even used yet... but just for those two I'm in love. The brush is fantastic for rubbing across the backside of an intricate die after you cut something to get all of those little pieces out easily. Trust me... it's worth it. I still use the poker tool to get the extras out of my actual paper diecut just because I'm afraid to ruin it, but I have been known to take it to the back of one here and there...
Also, these awesome snowflake dies from Lawn Fawn... I didn't even bother cutting the dies apart for this one. If I'm going to want one snowflake for a project, I'll probably want more and I just keep the extras in a little container and they have been very handy in the past. I've done the same with my autumn leaves as well...
That's it.. nothing earth shattering, but maybe an aha moment for one or two of you...

I do love this snowflake doily so much and am looking forward to being able to use it more because I'm gonna be starting on my holiday cards very shortly..
So... after I cut my snowflake, I cut my background panel to size and attached the snowflake. Then I splattered some water droplets onto the whole thing and dabbed the puddles off leaving this awesome distressed but almost snowy look.

Love the Hug In A Mug sentiments set from MFT... it was perfect for this... I chose to stamp and emboss mine in white on vellum cut using my CDD Flag Banner Dies because the thought of covering up that pretty background was not pleasing to me...I'm usually a little messy with my embossing powder. I just love the look of a little stray powder ... idk why... it pleases my messy mind... I know it probably drives some of you crazy, but that's ok... you can be more careful with yours...
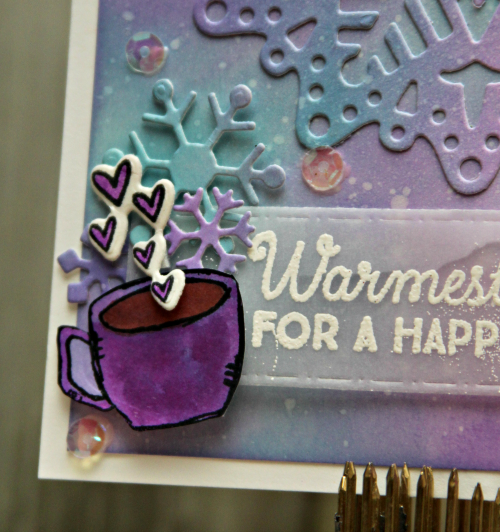
I decided to add this pretty sketchy cup from Stamplorations. I stamped it onto some of the leftover ink blended paper and cut it out. I added some extra purple to make it stand out using my Zig watercolor markers and of course made my coffee brown. I couldn't help but add a few snowflakes and my favorite steam using the hearts from the Somewhere Over The Rainbow set from Paper Sweeties and my favorite clearish sequins from CDD...

That's it for me. Hope you enjoyed it and I hope you'll play along! You have until the 24th and you can play along with one day or all... lots of prizes... check out the MFT blog! And come back here soon! Tomorrow I'll have my last project for Camp Create!
4 comments:
This is gorgeous! LOVING those colors and that snowflake!!!!!!!!!!!!
Oh how PRETTY!!! I LOOOOVE that background and the snowflake!!! Beautiful colors! :)
Theresa
Theresa’s Crafty Creations
oh happy purple snowflake card! ROCK STAR!!! I always want to create after reading your posts! Hugs!
Such a pretty card, Lisa! The heat embossing works perfectly with your colors.
Post a Comment